
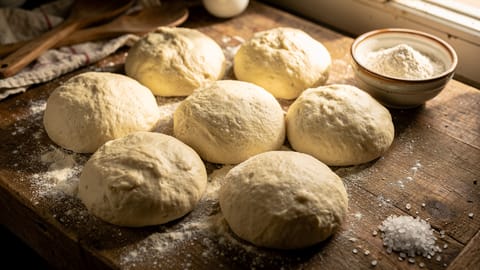
Dough Ball
An individual portion of pizza dough, shaped into a smooth sphere after bulk fermentation. Each dough ball becomes one pizza, with typical weights ranging from 200-500g depending on the style.
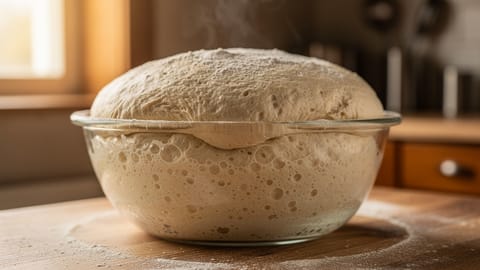
A dough ball (Italian: panetto) is the individual portion of pizza dough that will become a single pizza. After bulk fermentation, the dough is divided by weight, shaped into smooth, taut spheres, and given a final proof before stretching and baking. The quality of your dough balls directly determines the quality of your pizza — proper shaping creates the surface tension needed for an even stretch and a well-risen cornicione (rim).
Dough ball weights by pizza style
The weight of each dough ball determines the size and thickness of the finished pizza. Choose based on your target style:
| Style | Ball weight | Pizza diameter | Crust character | Notes |
|---|---|---|---|---|
| Neapolitan | 200-250g | 25-30cm | Thin center, puffy rim | Classic 250g for a 30cm pizza |
| Neapolitan (large) | 270-300g | 30-35cm | Same proportions, larger | For home ovens that run cooler |
| New York | 280-350g | 35-45cm | Thin, foldable, crispy | Larger due to thinner stretch |
| Detroit | 400-600g | Fits pan size | Thick, focaccia-like | Weight depends on pan dimensions |
| Roman al taglio | 300-500g | Sheet pan section | Light, airy, crispy | Higher hydration dough |
| Bar/tavern | 200-250g | 30-35cm | Ultra-thin, cracker-like | Rolled, not hand-stretched |
| Grandma/Sicilian | 400-600g | Fits pan | Thick, spongy | Similar to Detroit |
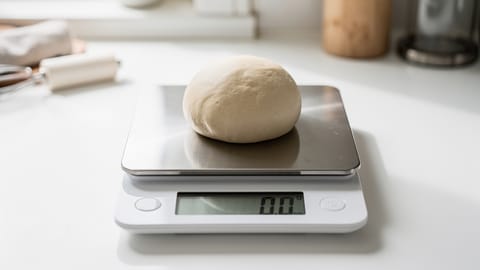
Use a kitchen scale for every divide. Eyeballing creates uneven pizzas — one too thick, the next too thin. Consistency comes from weighing.
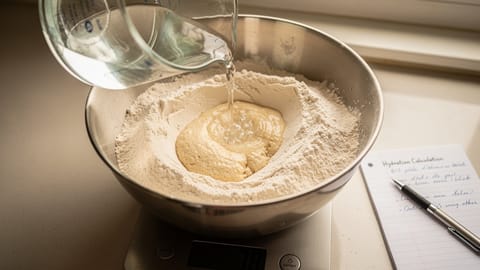
Calculating dough ball weight
If you know your target pizza size and thickness, you can calculate the ball weight using baker's percentages. For a standard Neapolitan at 65% hydration:
- 30cm pizza = ~250g dough ball
- 33cm pizza = ~280g dough ball
- 35cm pizza = ~300g dough ball
Fond's Pizza Workshop calculates this automatically — set the number of pizzas and target size, and the app gives you exact ball weights and ingredient quantities. You can also use the pizza dough calculator to get precise dough ball weights and full ingredient lists for any style.
How to shape dough balls
Shaping (also called balling or rounding) creates the smooth, taut surface that makes stretching possible. A well-shaped ball stretches evenly; a poorly shaped one tears or stretches unevenly.
Step by step
- Lightly flour your work surface — just enough to prevent sticking. Too much flour creates dry spots.
- Divide the dough — use a bench scraper to cut portions from the bulk. Weigh each piece on a scale and adjust by pinching off or adding small pieces.
- Pre-shape — with the cut side facing up, fold the edges of each piece toward the center, one at a time, like folding a letter. This begins building surface tension.
- Flip seam-side down — place the dough on an unfloured section of your work surface. The slight friction between dough and counter is essential.
- Cup and rotate — place both hands around the dough ball, cupping it from the sides (not pressing from the top). Using the friction of the counter, rotate the ball by pulling it toward you with a slight downward pressure. Repeat 4-6 times until the surface is smooth and taut.
- Seal the bottom — if the bottom seam is open, flip the ball and pinch it closed. Then flip back seam-side down.
- Place in container — transfer seam-side down to an oiled proofing container or a lightly floured tray.
Surface tension
Surface tension is the key concept. The outer skin of the dough ball should be smooth and tight, like a drum. This tension:
- Holds the ball's shape during proofing
- Creates resistance that allows controlled stretching
- Prevents the dough from spreading into a flat disc
- Helps form the cornicione (puffy rim) during baking
If the ball is not taut enough, it will spread flat during proofing. If it is too tight, it will be hard to stretch and may spring back.
Ball proof (final proof)
After shaping, dough balls undergo a final proof — the last fermentation stage before stretching and baking. During this phase, yeast continues to produce gas while the gluten relaxes, making the dough extensible enough to stretch into a pizza.
Proofing schedules
| Method | Temperature | Duration | Best for |
|---|---|---|---|
| Room temp, quick | 24-26°C | 1-2 hours | Same-day pizza, commercial yeast |
| Room temp, long | 20-22°C | 3-6 hours | Better flavor, moderate planning |
| Cold proof | 3-5°C | 24-48 hours | Best flavor, weekend baking |
| Cold proof, extended | 3-5°C | 48-72 hours | Maximum flavor complexity |
| Cold then room temp | Fridge → counter | Cold time + 1-2 hours at RT | Flexibility — proof cold, temper before use |
For cold-proofed balls, always bring them to room temperature for 1-2 hours before stretching. Cold dough is tight and will resist stretching — it needs time to relax and warm up.
Signs the ball proof is done
- Puffy and light: the ball has visibly expanded and feels airy when lifted
- Poke test: press a floured finger gently into the ball. If the indent springs back slowly and mostly fills in, the ball is ready. If it springs back fast, it needs more time. If it does not spring back at all, it is over-proofed.
- Jiggly: the ball wobbles when you gently shake the container
- Slightly spread: the ball has relaxed and widened slightly from its original tight shape
Under-proofed vs over-proofed
| Under-proofed | Properly proofed | Over-proofed | |
|---|---|---|---|
| Shape | Still tight and round | Slightly spread, puffy | Very flat, spreading |
| Poke test | Springs back fast | Springs back slowly | Does not spring back |
| Stretching | Resists, springs back | Stretches easily, holds shape | Tears easily, very thin |
| Baked result | Dense, tough, small | Light, airy, well-risen rim | Flat, no rim, possibly gummy |
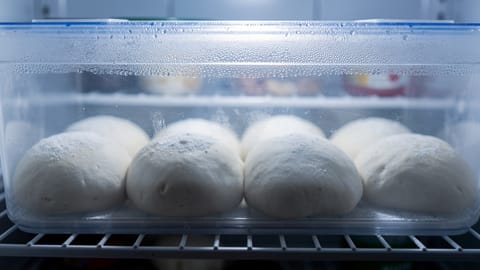
Storage and containers
Container options
| Container | Pros | Cons | Best for |
|---|---|---|---|
| Individual deli containers (500ml) | Each ball separate, stackable, easy to grab | Need many containers | Cold fermentation, small batches |
| Proofing tray with lid | Fits multiple balls, professional | Balls can touch if too close | Pizzeria-style, large batches |
| Sheet pan with plastic wrap | Cheap, readily available | Wrap can stick | Room temp proof |
| Oiled bowl with cover | Works in a pinch | Hard to remove without deflating | Emergency only |
Preventing sticking
- Oil: lightly coat containers with olive oil. The ball slides out cleanly.
- Flour: dust the tray or container. Works for short proofs but can create dry patches on long cold proofs.
- Semolina: coarser than flour, prevents sticking without absorbing into the dough as much.
Spacing
Leave at least 5cm between balls on a tray. During proofing they will spread, and touching balls fuse together and cannot be separated without tearing.
Common mistakes
| Mistake | What happens | Fix |
|---|---|---|
| Not using a scale | Uneven pizzas — some thick, some thin | Weigh every ball |
| Tearing the surface during shaping | Weak spots that tear during stretching | Be gentler; if torn, re-ball and rest 15 min |
| Over-flouring | Dry spots that do not stretch and create white patches | Use minimal flour; switch to oil for container |
| Skipping the proof | Tight dough that fights stretching, springs back | Always proof at least 1 hour at room temp |
| Over-proofing | Flat, slack balls that tear easily | Monitor time; use cold fermentation for wider window |
| Refrigerating without cover | Dry skin forms on the surface | Always cover airtight |
| Not tempering cold balls | Tight, hard to stretch, tears instead of stretches | Bring to room temp 1-2 hours before use |
Tips for better dough balls
Use a bench scraper for dividing. A bench scraper makes clean cuts without tearing the dough. Cut decisively — sawing back and forth tears the gluten network.
Work on a clean surface. A very lightly floured or unfloured work surface gives you the friction needed for shaping. Too much flour and the ball slides instead of building tension.
Be quick. The more you handle the dough, the stickier and harder to work it becomes. Shape each ball in under 30 seconds. Speed comes with practice.
Mark your containers. Write the date, time, weight, and recipe on each container. After a few batches you will know exactly how long your dough needs to proof in your kitchen.
Plan backward from dinner. Decide when you want to bake, then count backward: 1-2 hours for room temp proof after refrigeration, plus the cold proof time, plus bulk fermentation. Fond's Pizza Workshop handles this timeline automatically.
Dough balls in Fond
Fond's Pizza Workshop makes dough ball management simple. Set the number of pizzas and the ball weight, and all ingredient amounts calculate automatically using baker's percentages. The app suggests proofing schedules based on your recipe and kitchen temperature, sends proofing reminders, and tells you when to pull balls from the fridge for tempering. All quantities adjust when you change the batch size via recipe scaling.
Frequently asked questions
How do I know what weight dough ball to use?
Start with 250g for Neapolitan-style or 300g for New York-style. Adjust up for larger pizzas or down for smaller ones. The weight-to-diameter relationship is roughly linear — 50g more gives about 3-4cm more diameter.
Can I freeze dough balls?
Yes. After shaping, place balls in individual airtight containers and freeze for up to 3 months. Thaw overnight in the refrigerator, then bring to room temperature for 1-2 hours before stretching. Frozen dough loses some rise, so expect a slightly denser result.
My dough balls keep spreading flat during proofing. Why?
Either over-proofed (too long or too warm) or under-shaped (not enough surface tension). Try shaping tighter, proofing shorter, or using cold fermentation to slow things down. Also check your hydration — very high hydration doughs (75%+) spread more and need tighter shaping.
What is the difference between a dough ball and a pâton?
Same thing. Dough ball is the English term. Pâton is French. Panetto is Italian. They all describe the individual portion of dough shaped into a sphere for proofing.

Cook smarter
Join the waitlist for Fond. Recipes, meal plans, and a little AI sous-chef that learns how you cook.
Related terms

Baker's Percentage
A method of expressing bread recipe ingredients as percentages relative to the total flour weight, making recipes infinitely scalable.
Bulk Fermentation
The primary rise of bread dough after mixing, where yeast or starter ferments the dough as a single mass before shaping.
Cold Fermentation
A technique of retarding dough in the refrigerator (2-5°C) for 24-72 hours, slowing yeast activity while allowing enzymes to develop deeper flavors and better texture.

Gluten Development
The process of building a protein network in dough through kneading, folding, or time, creating the structure that gives bread its chew and allows it to rise.
Hydration (Bread)
The ratio of water to flour in bread dough, expressed as a percentage. Higher hydration means wetter, more open-crumb bread.
Kitchen Scale
A digital scale for measuring ingredients by weight — far more accurate than cups and spoons, especially in baking.
Neapolitan Pizza Dough
Neapolitan dough the way Naples does it: 00 flour, 60-62% hydration, long fermentation, and extreme heat. This guide follows AVPN standards and adapts them for home ovens, including flour brands, fermentation schedules, and a full troubleshooting section.