How to Cook Dried Beans: Every Method, Every Bean
A complete guide to cooking dried beans, covering soaking methods (overnight, quick-soak, no-soak), stovetop, slow cooker, and pressure cooker techniques, a cooking-time chart for 12 bean varieties, the salt timing debate, storage and freezing, and troubleshooting common problems like hard beans and split skins.
TL;DR: Soak dried beans 8-12 hours (or skip soaking entirely; it's optional). Cook on the stovetop in salted water for 1-2 hours, in a slow cooker for 6-8 hours, or in a pressure cooker for 8-15 minutes. One pound of dried beans yields about 6 cups cooked, the equivalent of four cans, at a quarter of the price. Salt from the start, add acid at the end, and freeze extras in their cooking liquid.
If you've never learned how to cook dried beans, you're probably overpaying for every pot of chili and every bowl of soup you've ever made. I spent years cracking open cans because I assumed dried beans were complicated: long soak times, unpredictable results, tough skins. Turns out most of that is myth. Dried beans are cheaper and tastier than I expected, and honestly easier once I understood the basics.
The first batch I ever made was black beans for tacos. I soaked them overnight, simmered them for about an hour, and the difference from canned was immediate. Better texture, real flavor, and I had enough for three meals instead of one. A one-pound bag cost $1.50. Four cans of the same beans would've been $6.
This guide covers everything: soaking options, three cooking methods, times for every common bean type, and the fixes for every problem you'll run into along the way.
Why cook dried beans instead of canned?
There are four solid reasons to switch from canned to dried, and cost is only the first.
Cost. A pound of dried beans costs $1-2 and yields about 6 cups cooked. The same amount from cans runs $4-8. Over a year, a household that eats beans twice a week saves $150-300. That's real money you could redirect with better grocery shopping tips.
Flavor and texture. Canned beans are cooked in the can at high pressure. They're soft, sometimes mushy, and taste mostly like the liquid they're packed in. Dried beans cooked at home hold their shape better, have a creamier interior, and absorb the flavors of whatever you cook them with: garlic, bay leaves, onions, chili peppers.
No additives. Canned beans often contain 300-500mg of sodium per serving, calcium chloride (a firming agent), and sometimes sugar. With dried beans, you control what goes in.
No BPA concerns. While many brands have moved to BPA-free can linings, not all have. Cooking from dried eliminates the question entirely.
The trade-off is time, but most of that time is passive. You're not standing over the pot for two hours. You're doing other things while the beans simmer.
Soaking dried beans: your three options
Soaking softens the outer skin and begins rehydrating the bean, which cuts cooking time and helps beans cook more evenly. But here's the thing the old cookbooks don't tell you: soaking is optional. Every method below works.
Overnight soak (traditional)
The simplest approach. Put beans in a large bowl, cover with 3-4 inches of cold water (beans expand significantly), and leave them on the counter for 8-12 hours or overnight. Drain and rinse before cooking.
This is my default method. I dump beans in a bowl before bed, and they're ready to cook by morning. No effort, no thinking.
Quick soak (1 hour)
If you forgot to soak overnight, this gets you most of the way there. Place beans in a pot, cover with 2 inches of water, bring to a boil for 2 minutes, then remove from heat, cover, and let sit for 1 hour. Drain and rinse.
The quick soak works fine, though some cooks find it produces slightly more split skins than the overnight method. The rapid temperature change can stress the outer layer. For dishes where appearance matters, stick with overnight.
No-soak method
Skip soaking entirely and add 30-60 minutes to your cooking time. Serious Eats tested this extensively and found that no-soak beans had deeper flavor and fewer blowouts than quick-soaked beans. The trade-off is extra time, but if you're using a slow cooker or pressure cooker, that extra time is negligible.
I use the no-soak method when I'm cooking beans in a slow cooker or pressure cooker, and the overnight soak when I'm going stovetop and want them done faster.
One exception: Kidney beans should always be boiled for at least 10 minutes, regardless of your soaking method, to destroy the lectin phytohaemagglutinin. This is important — undercooked kidney beans can cause severe digestive distress.
Cooking times by bean type
Not all beans cook at the same rate. Use this chart as your baseline. Actual times vary with bean age, altitude, and water hardness.
| Bean Type | Stovetop (soaked) | Stovetop (unsoaked) | Pressure Cooker (soaked) | Slow Cooker (unsoaked) |
|---|---|---|---|---|
| Black beans | 60-75 min | 90-120 min | 8-10 min | 6-8 hrs (low) |
| Pinto beans | 60-90 min | 90-120 min | 8-10 min | 6-8 hrs (low) |
| Navy beans | 45-60 min | 75-90 min | 7-8 min | 5-7 hrs (low) |
| Cannellini | 60-90 min | 90-120 min | 10-12 min | 6-8 hrs (low) |
| Kidney beans | 60-90 min | 90-120 min | 10-12 min | 8 hrs (low)* |
| Chickpeas | 90-120 min | 120-180 min | 12-15 min | 8 hrs (low) |
| Great Northern | 45-60 min | 75-90 min | 8-10 min | 5-7 hrs (low) |
| Lima beans | 45-60 min | 60-90 min | 6-8 min | 5-7 hrs (low) |
| Black-eyed peas | 30-45 min | 60-75 min | 5-7 min | 5-6 hrs (low) |
| Cranberry beans | 60-75 min | 90-120 min | 8-10 min | 6-8 hrs (low) |
| Lentils (green/brown) | 20-30 min | N/A (no soak needed) | 4-6 min | 4-6 hrs (low) |
| Split peas | 25-35 min | N/A (no soak needed) | 5-8 min | 4-6 hrs (low) |
*Kidney beans must reach a full boil for at least 10 minutes. Slow cookers on low may not reach a high enough temperature, so boil kidney beans on the stovetop for 10 minutes before transferring to the slow cooker.
How to tell when beans are done: Squeeze one between your fingers. It should crush easily with no chalky, hard center. The skin should be intact but tender. Take a few from the pot, not only one, because beans on top may cook slower than those submerged.
Cooking methods: stovetop, slow cooker, pressure cooker
Stovetop method
The stovetop is the most reliable and forgiving method. You can watch the beans, adjust the heat, and test them easily.
What you need: A large pot with a lid, beans, water, salt, and whatever aromatics you like.
- Drain soaked beans (or use unsoaked). Place in a large pot and cover with 2 inches of fresh water. Beans expand during cooking, so use more water than you think you need.
- Add aromatics. A halved onion, 2-3 smashed garlic cloves, a bay leaf, and a pinch of cumin is my standard base. These infuse the beans with background flavor.
- Bring to a boil, then reduce to a gentle simmer. You want small, lazy bubbles. A hard boil breaks skins and cooks beans unevenly.
- Add salt. One teaspoon of fine salt per quart of water. Add it now, not later (see the salt section below).
- Simmer partially covered, checking water level every 30 minutes. Add hot water if the beans poke above the surface. Exposed beans cook unevenly and develop tough spots.
- Start tasting at the minimum time listed in the chart above. Beans are done when creamy throughout with no chalky center.
Yield tip: I always cook the full pound, even if I only need half. The extras go straight to the freezer for meal prep later in the week. Already cooked beans make weeknight dinners drastically faster.
Slow cooker method
Cooking dried beans in a slow cooker is the ultimate hands-off approach. Dump everything in before work, come home to perfectly cooked beans. This is ideal if you're doing meal planning and want a batch ready without babysitting a pot.
What you need: A slow cooker (4-quart or larger), beans, water, salt, aromatics.
- Add dried beans (soaked or unsoaked) to the slow cooker. Unsoaked is perfectly fine here; the long cooking time compensates.
- Cover with 3 inches of water. Slow cookers don't lose much water to evaporation, but beans absorb a lot, so err on the side of more.
- Add aromatics and 1 teaspoon of salt per quart of water.
- Cook on low for 6-8 hours or high for 3-4 hours. Most beans finish in this window, though chickpeas and kidney beans may need the full 8 hours on low.
- Check at the minimum time. If beans are still firm in the center, continue cooking and check every 30 minutes.
Slow cooker caution for kidney beans: Slow cookers on the low setting may not reach a high enough temperature to neutralize lectins in kidney beans. Always boil kidney beans on the stovetop for 10 minutes first, then transfer to the slow cooker to finish.
Flavor trick: Sauteing your aromatics (onion, garlic, spices) in a skillet for 5 minutes before adding them to the slow cooker makes a noticeable difference. Raw aromatics in a slow cooker work, but toasted ones are better.
Pressure cooker (Instant Pot) method
A pressure cooker is the fastest way to cook dried beans, and it's what I reach for when I forget to soak overnight. Soaked beans finish in under 15 minutes. Even unsoaked beans are done in 25-40 minutes, which is faster than soaked stovetop beans.
What you need: An electric pressure cooker (Instant Pot, etc.) or stovetop pressure cooker, beans, water, salt, aromatics.
- Add beans (soaked or unsoaked) to the pressure cooker. Don't fill past the halfway mark. Beans expand significantly and can clog the valve if overcrowded.
- Cover with 2 inches of water. Less than stovetop or slow cooker because there's virtually no evaporation.
- Add salt and aromatics. Same as the other methods: salt from the start.
- Lock the lid and cook at high pressure for the time listed in the chart. Use the soaked time if soaked, or add 10-15 minutes for unsoaked.
- Natural release for 15 minutes, then quick-release any remaining pressure. Natural release lets the beans finish cooking gently and prevents split skins. Don't quick-release immediately. The sudden pressure drop blows the skins off.
Avoid foaming: Add a tablespoon of oil to the pot. Beans produce foam during pressure cooking, and oil keeps it under control. This is especially important with soybeans, chickpeas, and lima beans, which foam the most.
The salt debate: when to season your beans
You've probably heard that salting beans during cooking makes them tough. Your grandmother said it, cookbooks repeat it, and it's been passed down for decades. It's also wrong.
America's Test Kitchen tested this rigorously. Beans cooked in salted water from the start had better texture, creamier interiors, and skins that held together better than unsalted beans. Here's why:
The science: Salt strengthens the pectin in bean skins by creating calcium-pectin cross-links (when combined with the calcium naturally present in cooking water). This makes the skins more resilient, so beans hold their shape instead of blowing out. Meanwhile, the salt penetrates gradually, seasoning the beans evenly from the outside in.
What toughens beans: Acid. Tomatoes, vinegar, citrus juice, and wine all slow down the softening of pectin. If you add tomatoes at the start, your beans may never fully soften. Add acidic ingredients in the last 15-20 minutes of cooking, after the beans are already tender.
My approach: One teaspoon of fine salt per quart of cooking water, added at the start. If I'm making beans for chili, I don't add the tomatoes, chili powder, or lime juice until the beans are tender. Then I simmer everything together for 15-20 minutes to meld the flavors. This gives you perfectly cooked dried beans for chili every time.
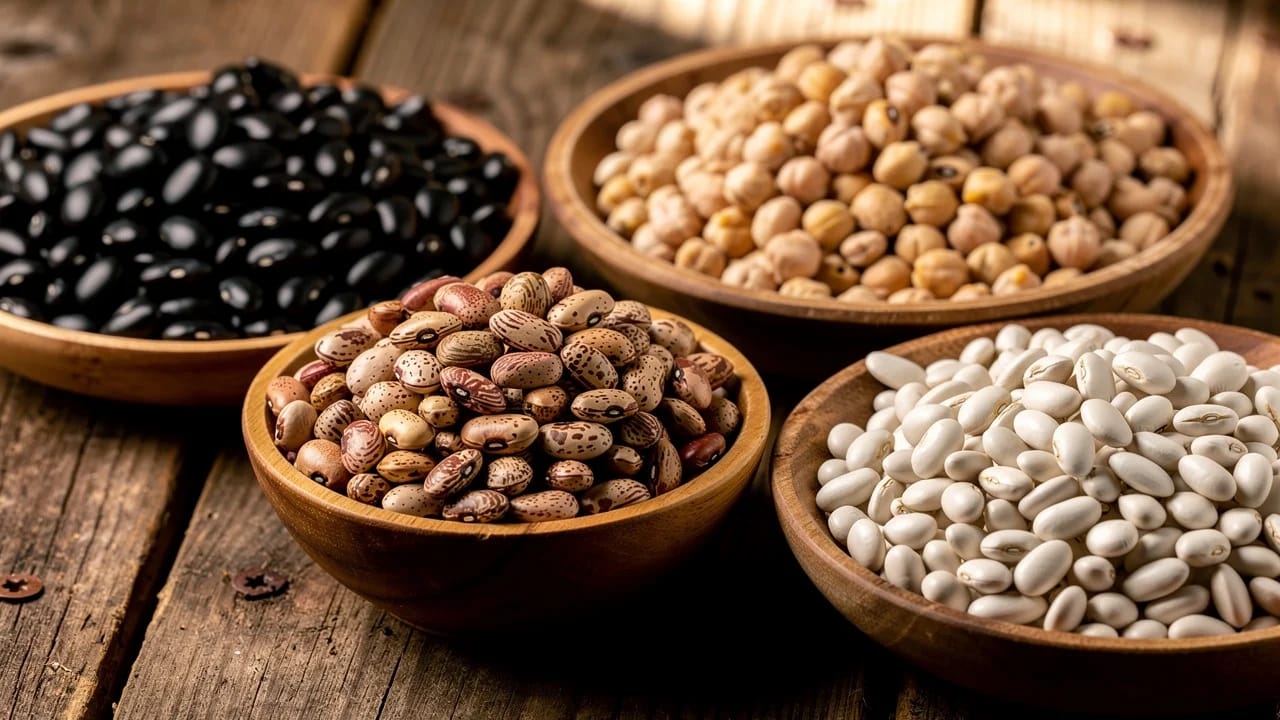
Types of dried beans and what to cook with them
Knowing which beans suit which dish helps you buy with purpose. Here's a quick reference:
- Black beans. Latin American staples. Rice and beans, burritos, Cuban black bean soup, chili. They hold their shape well and have a dense, meaty texture.
- Pinto beans. The refried bean. Also great whole in chili, burritos, and Tex-Mex bowls. Creamy when cooked, they break down beautifully when mashed.
- Chickpeas (garbanzo beans). Hummus, falafel, curries, grain bowls, and roasted as a crunchy snack. The most versatile bean in the pantry.
- Navy beans. Classic baked beans and Senate bean soup. Small and mild, they absorb flavors like a sponge.
- Cannellini. Italian white bean soups, pasta e fagioli, and Tuscan bean salads. Creamy and elegant.
- Kidney beans. Chili con carne, red beans and rice, minestrone. Firm and hearty. Always boil for 10 minutes.
- Great Northern. Similar to cannellini but smaller. White chili, casseroles, and stews.
- Lentils. Don't need soaking. Indian dal, lentil soup, and salads. Cook in 20-30 minutes.
Storing and freezing cooked beans
Once you start cooking dried beans, you'll quickly realize the most efficient move is to cook the entire bag and store the extras. One pound of beans makes enough for 3-4 meals. Batch cooking like this is a cornerstone of good meal prep.
Refrigerator storage (up to 5 days)
Store cooked beans in their cooking liquid in an airtight container. The liquid keeps them moist and prevents the skins from drying out and splitting. They'll keep for 5 days in the fridge.
Freezer storage (up to 6 months)
Freezing cooked beans is one of the best kitchen shortcuts. Here's how to do it right:
- Cool beans completely in their cooking liquid. Don't freeze them hot. It raises the freezer temperature and affects other food.
- Portion into zip-lock bags or containers. I freeze in 1.5-cup portions, which is roughly equivalent to one drained can. Flat zip-lock bags stack efficiently and thaw faster.
- Include some cooking liquid in each bag, about half an inch. This prevents freezer burn and keeps beans moist during reheating.
- Label with the bean type and date. Frozen beans are hard to identify visually.
- Freeze flat on a sheet tray, then stack once solid.
To use frozen beans: Thaw overnight in the fridge, or add them directly to soups, stews, and chilis while still frozen. For dishes where you need drained beans (salads, tacos), thaw and drain.
Cost comparison: Frozen homemade beans cost roughly $0.12 per serving. Canned beans average $0.60. That's a significant difference if beans are a regular part of your rotation, and it pairs well with strategies you'd learn from our grocery shopping tips guide.
Troubleshooting
Cause: Old beans (over 2 years), hard water, or acid added too early.
Fix: If your beans have been simmering for well past the expected time and are still hard, they're likely old stock. There's no reliable fix for stale beans. For your next batch: buy from stores with high turnover, check for a packed-on date, and don't add tomatoes, vinegar, or citrus until beans are fully tender. If you suspect hard water, try adding a pinch of baking soda (1/4 teaspoon per pound of beans) to the cooking water.
Cause: Overcooked, boiled too hard, or quick-soaked too aggressively.
Fix: Beans need a gentle simmer, not a rolling boil. Hard boiling breaks skins and turns the interior to paste. Start checking for doneness 15 minutes before the minimum time in the chart. If you're using a pressure cooker, try reducing cooking time by 2-3 minutes and using natural release instead of quick release.
Cause: Rapid temperature changes (quick soak, quick pressure release), boiling too hard, or not enough salt.
Fix: Use the overnight soak instead of the quick soak. Simmer gently. Add salt to the cooking water from the start. It strengthens the skins. In a pressure cooker, always use natural release for at least 15 minutes. You can also try blanching and shocking the beans briefly before the main cook if skin integrity is critical (for example, in a bean salad).
Cause: Not enough salt, no aromatics, or the cooking liquid was discarded.
Fix: Salt the cooking water from the start (1 tsp per quart). Add aromatics: onion, garlic, bay leaf, cumin, or smoked paprika. Don't drain the cooking liquid. It's full of flavor and body. Use it as the base for soups, or store beans in the liquid so they continue absorbing flavor as they cool.
Cause: Oligosaccharides, complex sugars that the human gut can't fully break down.
Fix: Soak beans and discard the soaking water, which removes some of these sugars. Start with smaller portions if you don't eat beans regularly. Your gut bacteria adapt over time. Cooking beans thoroughly also breaks down more of these compounds. Adding a strip of kombu seaweed to the cooking pot is a traditional Japanese technique that some cooks swear by for reducing gas.
Cause: Starch released during cooking. This is normal and useful.
Fix: This isn't a problem — it's a feature. The starchy cooking liquid (sometimes called pot liquor) is excellent for thickening soups, stews, and chili. If you want a cleaner liquid, skim the foam that rises during the first 10-15 minutes of cooking and use more water.
Final tips
Cooking dried beans is one of those fundamental kitchen skills that pays for itself over and over. It takes almost no effort, the results are better than canned, and having a freezer stocked with ready-to-go beans makes weeknight cooking dramatically easier. Whether you're simmering black beans for tacos or pressure-cooking chickpeas for hummus, the technique is the same: water, salt, heat, patience.
Start with one bag of black beans or pintos this weekend. Cook the whole thing, eat half, freeze half. You'll never look at canned beans the same way.
Organize your recipes, plan your meals, and generate smart shopping lists with Fond. Free for 14 days, no credit card required.
Frequently asked questions
It depends on the variety and whether you soaked them. Soaked black beans take about 60-75 minutes on the stovetop, while soaked chickpeas need 90-120 minutes. Unsoaked beans add roughly 30-60 minutes to the cooking time. A pressure cooker cuts all times by about two-thirds.
No. Soaking shortens cooking time and can improve texture, but it's not required. You can cook dried beans without soaking by adding 30-60 minutes to the stovetop time. Some cooks prefer the no-soak method because it produces beans with deeper flavor and fewer split skins.
Yes. Despite the old advice, salting the cooking water from the start produces better beans. Salt strengthens the skin, which helps beans hold their shape, and seasons them evenly throughout. A teaspoon of salt per quart of water is a good starting point.
The most common causes are old beans, hard water, and adding acid too early. Beans older than 2 years may never fully soften. Acidic ingredients like tomatoes and vinegar toughen the skins, so add them only in the last 15-20 minutes of cooking.
Absolutely. Cooked beans freeze beautifully for up to 6 months. Freeze them in their cooking liquid in portion-sized containers or zip-lock bags. The liquid prevents freezer burn and keeps them moist when reheated. Thaw overnight in the fridge or add frozen beans directly to soups and stews.
One cup of dried beans yields about 2.5-3 cups cooked, depending on the variety. That's roughly equivalent to two 15-ounce cans of beans. A one-pound bag of dried beans produces 5-6 cups cooked, which is enough for multiple meals.
Nutritionally, dried and canned beans are similar. The main difference is sodium: canned beans contain 300-500mg of sodium per serving, while dried beans cooked at home have virtually none unless you add salt. Dried beans also avoid BPA, which can be present in some can linings.
A pressure cooker or Instant Pot is the fastest method. Most soaked beans cook in 8-15 minutes at high pressure, plus time for the cooker to pressurize and release. Even unsoaked beans finish in 25-40 minutes. It's the best option when you forget to soak the night before.
Sources

Cook smarter
Join the waitlist for Fond. Recipes, meal plans, and a little AI sous-chef that learns how you cook.
Related guides
Grocery shopping tips that actually save money
A practical guide to saving money on groceries through meal planning, smart list-building, the 6-to-1 shopping method, understanding store layout psychology, buying smarter (unit prices, store brands, frozen produce), strategic shopping timing, and reducing waste. Includes USDA spending benchmarks and FAQ.

Weekly meal planning for beginners: a practical guide to getting started
A no-nonsense starter guide to weekly meal planning. Covers why it works, how to begin with just a few meals, building a shopping list, common beginner mistakes, and the tools that actually help.