Neapolitan Pizza Dough
Neapolitan dough the way Naples does it: 00 flour, 60-62% hydration, long fermentation, and extreme heat. This guide follows AVPN standards and adapts them for home ovens, including flour brands, fermentation schedules, and a full troubleshooting section.
TL;DR: This neapolitan pizza dough recipe uses four ingredients: Type 00 flour, water (60–62% hydration), salt, and yeast. Long fermentation (8–72 hours) and extreme heat (800–900°F) produce a soft, airy crust with leoparding and char. Master your mixing temperature, balling, and fermentation timing. Everything else is secondary.
What makes Neapolitan pizza dough authentic
Neapolitan pizza dough is the benchmark for pizza making, originating from Naples, Italy. This naples pizza recipe tradition is protected by the Associazione Verace Pizza Napolitana (AVPN), which sets strict guidelines for what counts as authentic neapolitan dough. The result is a soft, pillowy crust with leopard-spotted char and an airy, tender crumb.
What makes Neapolitan dough work is its simplicity: four ingredients. Flour, water, salt, and yeast. No oil, no sugar, no additives. Everything comes down to technique, fermentation, and high-heat baking.
After making this dough hundreds of times, the single biggest variable I've found isn't the flour brand or the yeast type. It's fermentation management. Get the timing and temperature right, and everything else falls into place.
AVPN standards and requirements
The AVPN specifies these criteria for AVPN pizza dough:
- Flour: Type 00 or Type 0 wheat flour, 12.5–13.5% protein
- Hydration: 55–62% water content (60–62% for home bakers)
- Salt: 2.5–3% of flour weight, sea salt
- Yeast: Fresh compressed yeast (lievito di birra), required, not optional
- Fermentation: Minimum 8 hours at room temperature
- Baking: 800–900°F (427–482°C) in a wood-fired oven, 60–90 seconds
These standards apply to certified pizzerias. Making neapolitan pizza at home means following the same principles with adapted equipment.
Essential Neapolitan pizza dough ingredients
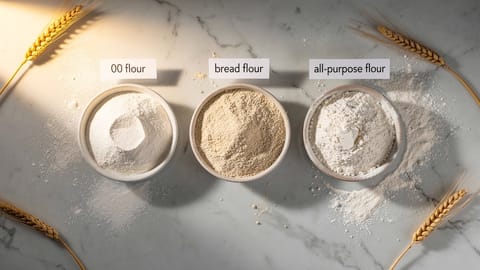
Flour: brand matters more than you think
Type 00 flour (our flour guide) is the foundation of any 00 flour pizza dough. The fine grind hydrates easily and produces that characteristic soft, tender crumb. But not all 00 flours are equal.
Outside Italy, these are the most reliable options:
| Brand | W-Rating | Best For | Notes |
|---|---|---|---|
| Caputo Pizzeria (blue bag) | W270 | Cold fermentation, home ovens | Used by most Neapolitan-style pizzerias outside Italy |
| Caputo Chef's Flour (red bag) | W300-320 | Long cold fermentation (48-72h) | More strength, better for extended ferments |
| Caputo Nuvola | W270-280 | Light, airy cornicione | Higher protein, produces an open crumb |
| King Arthur 00 | ~W250 | US availability | Solid substitute; slightly different crumb than Caputo |
Avoid all-purpose flour for Neapolitan style. The protein type and grind produce a noticeably tougher texture.
A note on yeast
AVPN requires fresh compressed yeast, but substitutions work. The key: instant yeast is the easiest substitute because it doesn't need blooming.
| Yeast Type | Conversion | Notes |
|---|---|---|
| Fresh compressed | 1x (baseline) | Best fermentation character; refrigerator shelf life ~2 weeks |
| Active dry | ~50% of fresh weight | Must bloom in warm water first; starts more aggressively |
| Instant (fast-acting) | ~33% of fresh weight | Add directly to flour; most practical for home bakers |
For 3g fresh yeast: use 1.5g active dry (bloomed) or 1g instant.
Diastatic malt: the optional upgrade
Diastatic malt powder at 0.5% of flour weight (~5g per kg) helps browning in home ovens where lower temperatures make deep caramelization harder to achieve. Available at home-brewing supply stores. Don't confuse with non-diastatic malt; the active enzymes are what matter. Add it with the flour at the start of mixing.
Standard formula
Yield: 4–5 pizza balls at 250–280g each (12-inch pizzas). For 2 pizzas, scale to 500g flour. Use the pizza dough calculator to adjust these quantities for any number of pizzas.
Lower yeast amounts for longer fermentation; higher for shorter.
Making Neapolitan pizza dough step by step
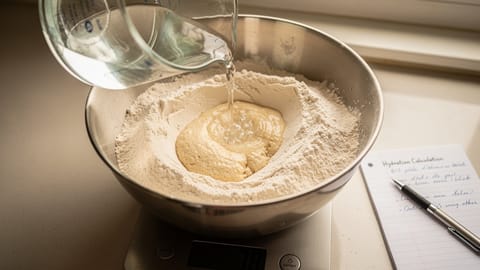
Mixing technique
Water temperature is one of the most overlooked variables. Use 80°F (27°C) water to activate yeast. This is where yeast wakes up quickly without damage risk. Never exceed 85°F (29°C); above that, you start killing cells. The actual kill temperature is 140°F (60°C), but activity degrades well before that.
For cold fermentation, activate the yeast in a small portion of warm water first, then use ice-cold water for the remaining hydration. This contrast (warm activation, cold dough) gives you precise control over fermentation speed.
Tip: Keep a kitchen thermometer handy. Even a few degrees outside the safe range can seriously affect your yeast activity and final dough quality.
Target final dough temperature: 73–77°F (23–25°C). Use a probe thermometer after mixing. If your dough is warmer, your fermentation will run faster than planned. Adjust by using colder water next time.
The finished dough should be soft, slightly tacky, and elastic. It's softer than NY-style dough, and that's correct.
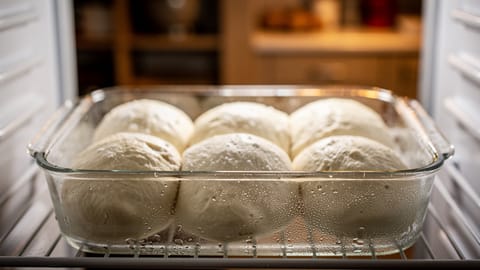
Bulk fermentation
Place the dough in a lightly oiled container and cover tightly. Ferment at room temperature (68–72°F / 20–22°C) for 2–4 hours.
What to look for:
- Under-fermented: Dense, tight, no bubbles at the container edge, dough doesn't pull away from sides easily
- Ready: Domed top, visible bubbles at edges, dough has grown 50–75% (doesn't need to fully double)
- Over-fermented: Collapsed, smells of alcohol, sticky and slack
If your kitchen is cooler than 68°F, extend the bulk fermentation by 30–60 minutes. Above 74°F, watch it closely and cut time.
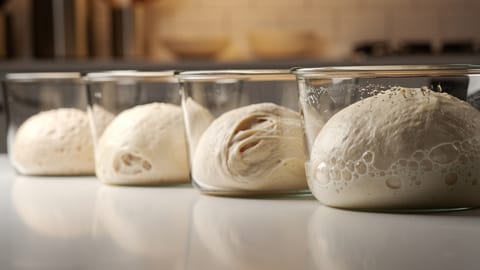
Fermentation: where flavor develops
Fermentation schedule comparison
| Schedule | Total Time | Yeast (fresh) | Process | Flavor |
|---|---|---|---|---|
| Same-day | 8–10h | 0.2–0.3% (2–3g/kg) | Bulk 2–3h → ball → room temp 6–8h | Mild, bread-like |
| Overnight | 18–24h | 0.1–0.15% (1–1.5g/kg) | Bulk 2h → ball → fridge 16–22h → temper 2h | More developed, cleaner |
| 48h cold | 48h | 0.08–0.1% (0.8–1g/kg) | Bulk 2h → ball → fridge 44–46h → temper 2h | Complex, slightly sweet |
| 72h cold | 72h | 0.05–0.08% (0.5–0.8g/kg) | Bulk 2h → ball → fridge 68–70h → temper 2–3h | Deep flavor; risk of over-fermentation if yeast not reduced |
48 hours is the sweet spot. The gluten relaxes fully, fermentation by-products develop without tipping into overproofed territory, and the dough is noticeably easier to stretch than same-day versions.
At 72 hours, read your balls before baking. If they're domed and puffy with visible gas bubbles, they're good. If they look flat and slack, they may have over-fermented.
Extended cold fermentation (full guide)
Cold fermentation also improves digestibility. Extended fermentation breaks down some of the gluten and starches that cause digestive discomfort, which is why people who struggle with regular pizza often tolerate 48–72h cold-fermented dough better.
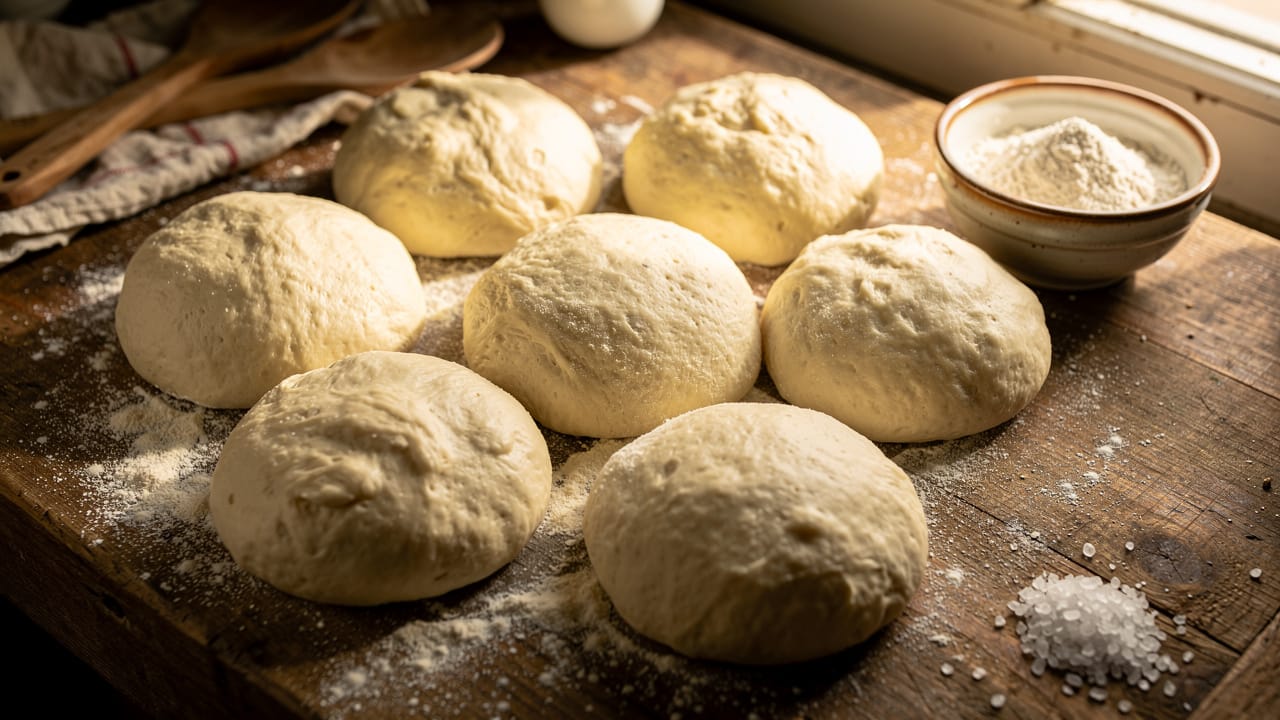
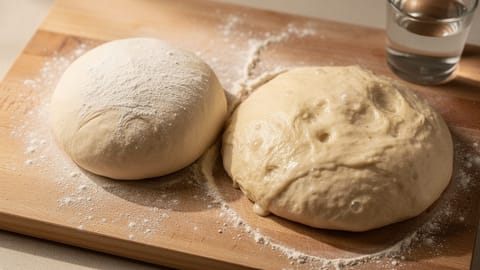
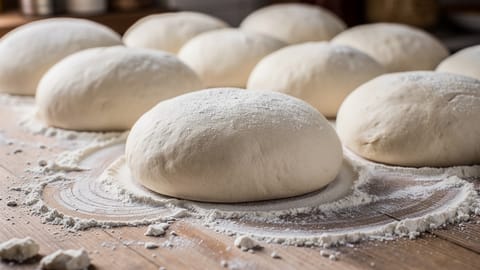
Balling the dough
After bulk fermentation, divide into 250–280g portions and shape into tight dough balls. This step matters more than most people realize.
Good balling technique creates surface tension by tucking the dough under itself repeatedly while rotating on the counter with cupped hands. The top surface stays untouched; fold the edges toward the bottom. The top should become smooth and taut like a drum skin. You should see the dough stretch slightly across the surface without tearing.
This tension holds the ball's shape during the final proof and creates the spring that produces a puffy cornicione. A poorly balled dough (torn, slack, or uneven) will spread flat and lose structure when you try to stretch it.
Tip: Store balls in individual airtight containers or on a floured tray under a damp towel. This prevents the surface from drying out and forming a skin during the final proof.
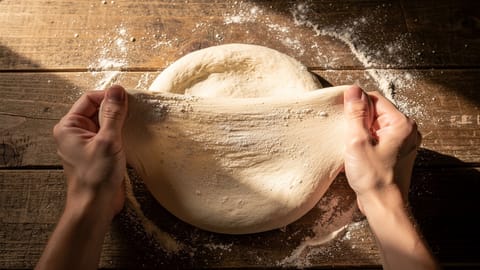
Shaping the dough
Shaping is where a lot of home bakers lose their fermentation work. The dough should be at room temperature and fully relaxed before you touch it.
Signs your dough ball is ready to shape: it's slightly domed, jiggles when you shake the container, and a finger pressed into it leaves an indent that springs back slowly.
If the dough springs back immediately, it needs more rest. Let it sit 15–30 minutes more and try again. Never force a tight dough.
Never use a rolling pin. It deflates the air pockets you spent 8–72 hours building.
Baking Neapolitan pizza
Authentic Neapolitan pizza needs extreme heat: 800–900°F (427–482°C) in a wood-fired oven for 60–90 seconds. This intense heat creates:
- Leopard spotting: Charred bubbles on the crust from rapid steam expansion
- Soft center: The interior stays tender because the bake is so short
- Puffy cornicione: The raised, airy rim that defines the style
Home oven: steel vs. stone
A pizza steel outperforms a pizza stone in home ovens because steel conducts heat faster. Target a surface temperature of 700–750°F on your steel/stone before launching. An infrared thermometer is worth buying for this.
| Pizza Steel | Pizza Stone | |
|---|---|---|
| Heat conductivity | High, faster bottom browning | Moderate |
| Preheat time | 45–60 min | 45–60 min |
| Durability | Near-indestructible | Can crack |
| Verdict | Recommended | Works, but slower |
The two-stone broiler method
For the closest home-oven match to a wood-fired oven:
- Place one pizza steel/stone on the lowest rack and a second on the highest rack, close to the broiler.
- Preheat both for 45–60 minutes at maximum temperature.
- Launch the pizza onto the bottom surface and bake 3–4 minutes until the bottom is set.
- Transfer to the top surface, under the broiler. Switch broiler to high.
- Watch closely. In 1–2 minutes the top chars and blisters; the cornicione puffs dramatically.
This two-stage method replicates the heat profile of a wood-fired oven: intense bottom heat for structure, overhead radiant heat for leopard spotting.
Dedicated pizza ovens
If you bake Neapolitan-style pizza regularly, a dedicated outdoor oven (Ooni, Gozney Dome) that reaches 900°F is the most direct upgrade. At those temperatures you get the full 60–90 second bake and char that home ovens can't replicate, regardless of technique.
Troubleshooting Neapolitan pizza dough
Quick-reference troubleshooting
| Symptom | Most Likely Cause | Fix |
|---|---|---|
| Dough tears when stretching | Under-proofed balls / cold dough | Rest 15–30 min at room temp before trying again |
| Dough springs back immediately | Gluten too tight | More rest; may need 30+ extra minutes |
| Crust pale and puffy, no char | Oven / steel not hot enough | Preheat longer; check with IR thermometer |
| Dense, heavy cornicione | Degassed during balling or shaping | Gentler balling; less finger pressure while shaping |
| Dough sticky and slack | Over-fermented | Reduce yeast or fermentation time next batch |
| Dough won't puff in oven | Dough too thick or rolled | Stretch thinner; never roll with a pin |
| Bottom burnt, top raw | Stone/steel too hot, broiler too far | Lower rack slightly; switch to two-stone method |
Common technique mistakes
Using the wrong flour: All-purpose or bread flour won't produce the same tender texture. The protein type is different, not only the amount.
Over-kneading: Neapolitan dough should be smooth and elastic, not tight. Over-working makes it hard to stretch and produces a chewier crumb than you want.
Skipping bulk fermentation: Going straight to balling gives you poor flavor and a weak gluten structure. Bulk fermentation isn't optional.
Adding too much yeast for cold fermentation: More yeast doesn't help. For extended fermentation, use minimal yeast (0.05–0.1% fresh) or the dough over-ferments and tastes of alcohol.
Not tempering cold dough: Cold-fermented dough straight from the fridge is too tight to stretch properly. Always allow 2–3 hours at room temperature.
Tap water with chlorine: Chlorine can inhibit yeast. If your water is heavily chlorinated, let it sit uncovered for 30 minutes before using, or use filtered water.
Neapolitan vs. other pizza styles
| Neapolitan | New York | Roman (al taglio) | |
|---|---|---|---|
| Flour | 00 | Bread flour | 00 or 0 |
| Hydration | 60–62% | 58–65% | 70–80% |
| Oil/sugar | None | Yes (both) | Olive oil |
| Fermentation | 8–72h | 24–72h | 24–72h |
| Oven temp | 800–900°F | 500–600°F | 500–550°F |
| Bake time | 60–90 sec | 8–12 min | 15–20 min |
| Crust character | Soft, floppy, charred | Chewy, crisp fold | Thick, airy, crisp base |
The Neapolitan difference
What sets Neapolitan pizza apart is the commitment to simplicity and technique. Four ingredients, time, and heat. Done well, this minimalist approach produces a crust with a flavor and texture no other style quite matches.
Make the same dough ten times before changing anything. You'll learn more from repetition than from tweaking variables. Once your hands know what properly fermented, properly balled dough should feel like, everything else clicks.
Frequently Asked Questions
Use Type 00 flour with 12.5–13.5% protein content. Outside Italy, Caputo Pizzeria (blue bag) is the most widely available option and is what most Neapolitan-style pizzerias use. King Arthur 00 is a reliable US alternative. Look for a W260–280 strength rating. All-purpose or standard bread flour won't produce the same soft, supple texture.
AVPN standards specify 55–62% hydration, with 60–62% being the sweet spot for home bakers. Lower hydration (58–60%) is easier to handle; higher hydration (62–65%) gives a slightly more open crumb but is harder to stretch. Start at 61% and adjust from there.
The AVPN minimum is 8 hours at room temperature, but 24–48 hours produces noticeably better flavor. For same-day dough, use 0.2–0.3% fresh yeast and ferment 8–10 hours at 68–72°F. For cold fermentation, use 0.05–0.1% fresh yeast and refrigerate 24–72 hours, then bring to room temperature 2–3 hours before baking. 48 hours is the sweet spot for flavor complexity without over-fermentation risk.
Yes, though results differ from a wood-fired oven. Preheat a pizza steel for 45–60 minutes at your oven's maximum temperature (500–550°F). Use the two-stone broiler method for best results: bake on the bottom stone first, then transfer to the top stone directly under the broiler for leopard spotting and oven spring.
Neapolitan dough at 60–62% hydration is naturally soft and slightly sticky — that's correct. If it's unmanageable, the most common causes are: not enough kneading (under-developed gluten), dough that's too warm, or over-fermentation. Make sure the dough passes the windowpane test and is fully kneaded before fermenting. Working in a warm kitchen? Reduce water temperature by a few degrees.
AVPN standards require fresh compressed yeast, but instant dry yeast works at about 33% of the fresh weight (3g fresh = 1g instant). Active dry yeast works at roughly 50% of the fresh weight (3g fresh = 1.5g active dry, bloomed first). Fresh yeast gives gentler, more predictable fermentation and a subtler flavor, but instant yeast is the most practical substitute for home bakers.
Neapolitan dough uses 00 flour, 60–62% hydration, no oil or sugar, and bakes in 60–90 seconds at 800–900°F. New York dough typically uses bread flour, 58–65% hydration, includes oil and sometimes sugar, and bakes 8–12 minutes at 500–550°F. The result: Neapolitan is soft, charred, and floppy; New York is chewier, crispier, and holds toppings without folding.
If the dough tears, it needs more rest — the gluten is too tense. Let the ball sit at room temperature for another 15–30 minutes and try again. When ready, press gently from the center outward with your fingers, then pick the disc up and let gravity stretch it while rotating. Never use a rolling pin. The schiaffo (slap) technique works well once you've practiced: drape the disc over your fists and stretch outward while rotating.

Cook smarter
Join the waitlist for Fond. Recipes, meal plans, and a little AI sous-chef that learns how you cook.
Related guides
Beginner Pizza Dough
Your first homemade pizza dough, from scratch. A simple same-day recipe with 4 ingredients, plus everything you need to know about mixing, kneading, and shaping.
Cold Fermentation Pizza Dough Guide
Slow-rise your dough in the fridge for 24, 48, or 72 hours. The longer it sits, the more complex the flavor gets. Most home bakers hit the sweet spot at 48 hours with 0.1% fresh yeast.
Pizza Dough Fermentation: Room Temperature vs Cold Fermentation
Room temp vs. fridge, 4 hours vs. 72 hours, and how to tell when your dough is actually ready. The time-temperature relationship is the single biggest lever for better-tasting pizza.
Pizza dough hydration: complete guide to water ratios
How the water-to-flour ratio shapes your crust. 60% gives you a stiff, easy-to-handle dough; 75%+ gives you open, airy crumb but requires more technique. Includes baker's percentages by style, a decision framework, bassinage technique, and fermentation interaction.
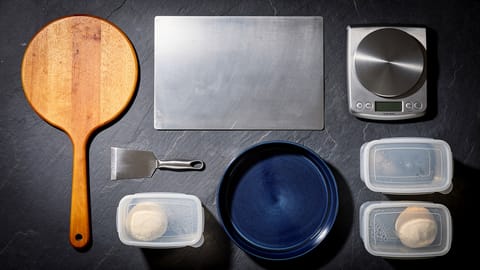
Essential Pizza Equipment: What You Actually Need
Stop wasting money on gadgets. A baking steel, a digital scale, and an infrared thermometer are the upgrades that actually matter. Everything else is a bonus.
Pizza Flour Guide: 00, Bread Flour, AP & Protein Content
00 vs. bread flour vs. all-purpose: what actually matters is protein content and how it matches your pizza style. Includes W values, brand recommendations, and a style-to-flour matching table.
Hydration (Bread)
The ratio of water to flour in bread dough, expressed as a percentage. Higher hydration means wetter, more open-crumb bread.
Dough Ball
An individual portion of pizza dough, shaped into a smooth sphere after bulk fermentation. Each dough ball becomes one pizza, with typical weights ranging from 200-500g depending on the style.